 In this article we’re going to build a Percona XtraDB Cluster using a pair of RackSpace Cloud Servers. Percona XtraDB Cluster is a MySQL compatible replacement supporting multi-master replication. For this project we’ll use the latest Ubuntu release and we’re going to use RackSpace Cloud Networks to setup an isolated segment for the replication between the cluster nodes. We’ll do two nodes in the cluster but you can add additional nodes as desired. Finally we’ll use a RackSpace Cloud Load Balancer to distribute traffic between the nodes.
To get started, create the cloud servers from the RackSpace control panel using the following guidelines:
- Make sure you choose a Next Gen region for the servers.
- For the Image choose “Ubuntu 13.04 (Raring Ringtail)”
- Select a size based on your requirements. We’re using 1GB for this article.
- In the Networks section, when creating the first server, click the “Create Network” button and add a network named “DatabaseInternal”. When creating additional servers, make sure that you select the “DatabaseInternal” network.
- If you need more storage then is included in the base image or if you want higher performance the consider using RackSpace Cloud Block Storage. This is not covered in this article.
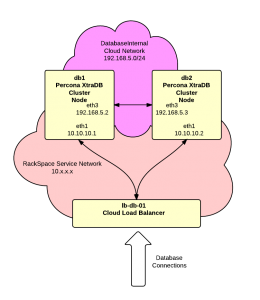
For this article we’ll assume that the “DatabaseInternal” cloud network is:
and our servers are:
|
|
db1.acme.com public: 1.1.1.1 private: 10.10.10.1 DatabaseInternal: 192.168.5.2 |
and:
|
|
db2.acme.com public: 1.1.1.2 private: 10.10.10.2 DatabaseInternal: 192.168.5.3 |
Here are the basic instructions from Percona that we’ll be following:
http://www.percona.com/doc/percona-xtradb-cluster/installation.html
To get started open SSH terminal sessions to each server and complete the following steps on each server unless noted otherwise:
1. Disable apparmor – the Percona docs state that the cluster will not work with apparmor and it must be disabled. Here are the steps:
|
|
/etc/init.d/apparmor stop /etc/init.d/apparmor teardown update-rc.d -f apparmor remove apt-get remove apparmor apparmor-utils |
Now reboot the server to get a clean system without apparmor running.
2. Configure firewall – Next we need to get a basic firewall configured to protect the servers. Ubuntu includes UFW (Uncomplicated Firewall) so we’ll go with that:
|
|
# allow incoming ssh ufw allow 22 # allow all connections on "DatabaseInternal" network ufw allow in on eth3 # turn on the firewall ufw enable |
If you’re not familier with UFW then here’s a good starting point:
https://help.ubuntu.com/community/UFW
3. /etc/hosts – Let’s add some entries to the /etc/hosts file:
|
|
192.168.5.2 db1-dbint 192.168.5.3 db2-dbint |
4. Add Percona apt Repository – Just follow the instructions here:
http://www.percona.com/doc/percona-xtradb-cluster/installation/apt_repo.html
The exact lines for sources.list are:
|
|
deb http://repo.percona.com/apt raring main deb-src http://repo.percona.com/apt raring main |
Don’t forget to run:
5. Install packages – Run the following command to install the cluster packages:
|
|
apt-get install percona-xtradb-cluster-server-5.5 \ percona-xtradb-cluster-client-5.5 |
You’ll be prompted by the installer to enter a root password for MySQL.
6. /etc/my.cnf – Setup configuration files on each server. The Percona distribution does not include a my.cnf file to you need to role your own. The minimal configuration would be something like this:
|
|
[mysqld] wsrep_node_address=192.168.5.3 wsrep_provider=/usr/lib/libgalera_smm.so wsrep_cluster_address=gcomm://db01-dbint wsrep_slave_threads=8 wsrep_sst_method=rsync binlog_format=ROW default_storage_engine=InnoDB innodb_locks_unsafe_for_binlog=1 innodb_autoinc_lock_mode=2 |
Most of this is straight from the Percona documentation. Key lines are:
|
|
wsrep_node_address=192.168.5.3 |
This tells Percona what address to advertise to other nodes in the cluster. We need this set to the server “DatabaseInternal” interface. Without this setting SST will fail when it uses the wrong interface and is blocked by the firewall.
|
|
wsrep_cluster_address=gcomm://db01-dbint |
This line identifies at least one other member in the cluster. Notice that we’re using the names we set in the /etc/hosts file.
The above example for my.cnf is very minimal. It does not address any database memory or performance tuning issues so you’ll likely want to expand upon the example.
7. /root/.my.cnf – Add a .my.cnf for MySQL root authentication as described here:
http://blogs.reliablepenguin.com/2012/10/09/create-my-cnf-file-for-mysql-authentication
This step is optional. The .my.cnf is convenient but should not be used in high security environments.
8. Bootstrap Cluster – The cluster needs to be bootstrapped on the first server when it’s started for the first time. This can be accomplished with:
|
|
/etc/init.d/mysql bootstrap-pxc |
The subject of bootstrapping is covered in more detail here:
http://www.percona.com/doc/percona-xtradb-cluster/manual/bootstrap.html
The first node startup will look something like this:
|
|
root@db1:~# /etc/init.d/mysql bootstrap-pxc * Bootstrapping MySQL (Percona XtraDB Cluster) database server mysqld [ OK ] * Checking for corrupt, not cleanly closed and upgrade needing tables. |
Now with the first node started, open a mysql command shell and view the wsrep_cluster_% status variables:
|
|
mysql> show status like "wsrep_cluster_%"; +--------------------------+--------------------------------------+ | Variable_name | Value | +--------------------------+--------------------------------------+ | wsrep_cluster_conf_id | 1 | | wsrep_cluster_size | 1 | | wsrep_cluster_state_uuid | 67d8795f-1339-11e3-94f1-9b7bbcee0e35 | | wsrep_cluster_status | Primary | +--------------------------+--------------------------------------+ 4 rows in set (0.01 sec) |
Notice that the wsrep_cluster_size is 1 and the wsrep_cluster_status is “Primary”. This is normal for the first node in a newly bootstrapped cluster.
Now we’ll start Percona normally on each additional server. So go to db2 and run:
This time the start should look something like this:
|
|
root@db2:~# /etc/init.d/mysql start * Starting MySQL (Percona XtraDB Cluster) database server mysqld * SST in progress, setting sleep higher mysqld [ OK ] * Checking for corrupt, not cleanly closed and upgrade needing tables. |
Startup for the second node adds the SST or “State Snapshot Transfer”. In this step the servers will use rsync and SSH keys to transfer a copy of the the database from the first server to the second server.
Back on the first server in our mysql command shell we can check the status again:
|
|
mysql> show status like "wsrep_cluster_%"; +--------------------------+--------------------------------------+ | Variable_name | Value | +--------------------------+--------------------------------------+ | wsrep_cluster_conf_id | 2 | | wsrep_cluster_size | 2 | | wsrep_cluster_state_uuid | 613f8f9a-133a-11e3-b4e0-9b8eeba56f39 | | wsrep_cluster_status | Primary | +--------------------------+--------------------------------------+ 4 rows in set (0.00 sec) |
Notice now according to the “wsrep_cluster_size” there are 2 nodes in the cluster.
At this point we have a functional cluster up and running.
If the second node fails to start then check the log file at:
/var/lib/mysql/db2.err
The most likely cause is a problem resolving or connecting to the db1-int server for SST.
9. Disable /etc/mysql/debian-start – The debian/ubuntu distribution of Percona includes a script at /etc/mysql/debian-start that checks and repairs tables on startup. We think this script is a bad idea in the cluster environment and should be disabled by running this command on each node:
|
|
touch /etc/mysql/NO-DEBIAN-START |
10. Add extra functions – There are a couple of Percona specific functions that can be added to support monitoring:
|
|
mysql -e "CREATE FUNCTION fnv1a_64 RETURNS INTEGER SONAME 'libfnv1a_udf.so'" mysql -e "CREATE FUNCTION fnv_64 RETURNS INTEGER SONAME 'libfnv_udf.so'" mysql -e "CREATE FUNCTION murmur_hash RETURNS INTEGER SONAME 'libmurmur_udf.so'" |
11. Add load balancer – The next step is to add the RackSpace Cloud Load Balancer. The load balancer will provide a single IP address for clients to connect to. It will then distribute these connections to the nodes in the cluster.
a. Login to your RackSpace Cloud Control Panel.
b. Go to Hosting section and the Load Balancers tab.
c. Click the “Create Load Balancer” button.
d. In the “Identification” section, enter a name for the load balancer like “lb-db-01” and select the Region. Use the same Region that the cluster nodes are located in.
e. In the “Configuration” section, select “On the Private RackSpace Network” for the “Virtual IP”. Set the “Protocol” to “MySQL” and the port to “3306”. Set the “Algorithm” to “Least Connections”.
f. In the “Add Nodes” section, click the “Add Cloud Servers” button and select each of the servers in the cluster.
g. Click the “Create Load Balancer” button to save the new load balancer.
It may take a couple of minutes for the load balancer to be created. When complete the IP address assigned to the load balancer will be visible. We’ll assume for this article that the address is:
Notice that this is a private, unroutable address on the RackSpace Service Network. This address is not accessible from the public Internet but it is visible to other cloud servers and devices in the same region on the RackSpace Service network. This is the address that your web or application servers will use to connect to the database.
12. Load balancer access controls – To minimize exposure of the database servers we need to add access controls on the load balancer that will limit the range of addresses that are allowed to connect. Generally you’ll only want connections from your web or application servers. In the RackSpace Cloud control panel, drill down to your load balance, find “Access Control” rules at the bottom and add a rule or rules to allow your client servers. Of course if you’re dynamically adding and removing servers then it might not be possible to use these access controls. Or you might need to use the load balancer API to dynamically change access controls.
13. Allow load balancer on firewalls – Next we need to adjust the firewall on each node to allow MySQL connections from the load balancer. The connections from the load balancer to the cluster nodes do not come from the load balancer address. Instead they can come from a range of addresses. The exact range depends on what region the load balancer was created in. At the time of writing this article the ranges were:
For the DFW region, use:
10.183.248.0/22
10.189.254.0/23
For the IAD region, use:
10.189.254.0/23
For the ORD region, use:
10.183.250.0/23
10.183.252.0/23
10.183.254.0/23
For the LON region, use:
10.190.254.0/23
For the SYD region, use:
10.189.254.0/23
This list may change over time. The latest ranges should be available here:
http://www.rackspace.com/knowledge_center/article/using-cloud-load-balancers-with-rackconnect
For this article we used the DFW region so the UFW rules would be:
|
|
ufw allow in on eth1 from 10.183.248.0/22 to any port 3306 ufw allow in on eth1 from 10.189.254.0/23 to any port 3306 |
14. Create database & users – Now we’re ready to create a database and user for our web application. For any of the cluster nodes, open a MySQL command shell, create the database and add a database user:
|
|
CREATE DATABASE mywebapp; GRANT ALL PRIVILEGES ON mywebapp.* TO 'mywebapp_user'@'%' IDENTIFIED BY 'some pass'; |
Now from your web application should be able to connect to the database cluster with the user that you just create. The database host should be the address of the load balancer.
15. Raise timeout – By default Cloud Load Balancers will timeout any idle connection after 30 seconds. This article shows how to raise the timeout:
https://community.rackspace.com/products/f/25/t/89
16. Add monitoring tools – You’ll probably want to add a few tools to monitor the database. Here’s what we normally install:
myq_gadets is a great set of monitoring utilites:
http://blogs.reliablepenguin.com/wp-admin/post.php?post=818&action=edit&message=6
mysqltuner helps adjust memory allocations based on actual performance:
Percona Toolkit which can be downloaded from here:
http://www.percona.com/software/percona-toolkit
At this point you’re done! You have a working database cluster connected to your web application. Questions and comments are welcomed.