 We want to build a high-availability storage cluster based on GlusterFS using RackSpace Cloud Servers on CentOS. Also we want to use RackSpace Cloud Networks to provide private networks for replication and cluster access. Finally we want to use RackSpace Cloud Block Storage with LVM and XFS to simplify future expansion.
This article is based on a previous article we published on the same topic for Ubuntu:
GlusterFS Cluster With Ubuntu On RackSpace Cloud
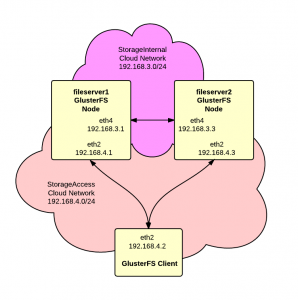
As shown in the diagram, we’ll have two Cloud Networks, one for replication between the servers and one for access by clients to the storage.
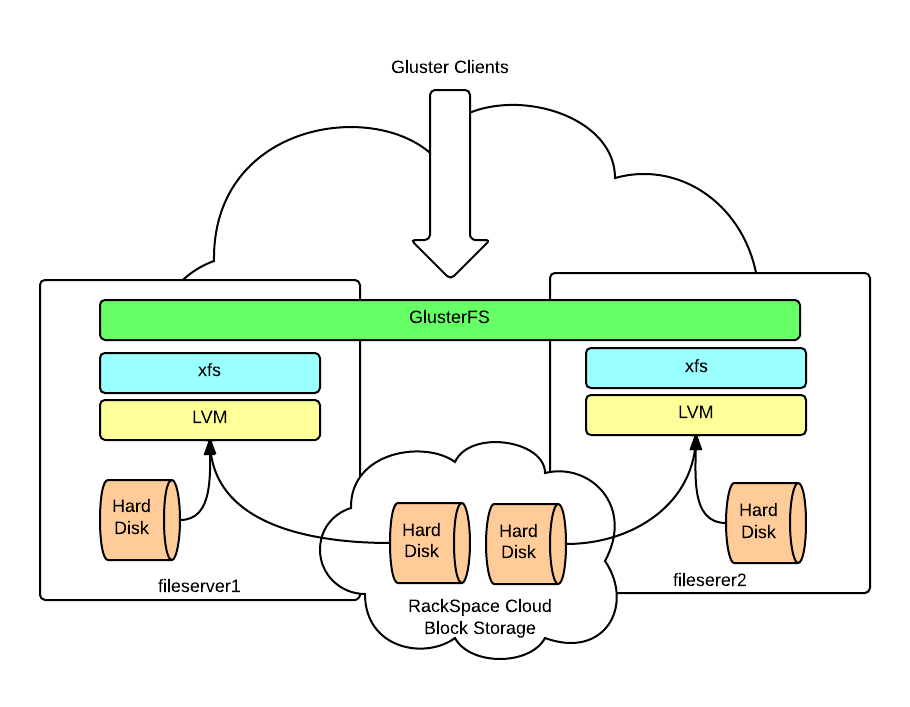
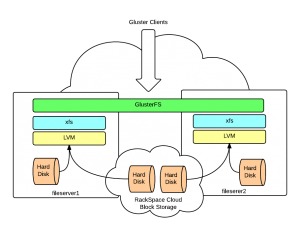 The next diagrams shows the filesystem layers – local, CBS, LVM, XFS and finally GlusterFS.
Part 1 – Server Setup
1. Create servers and networks – Login to your RackSpace Cloud account and create two server following these guidelines:
- Make sure you choose a Next Gen region for the servers.
- For the Image choose “CentOS 6.4”
- Select a size based on your requirements. We’re using 1GB for this article.
- In the Networks section, when creating the first server, click the “Create Network” button and add a network named “StorageInternal”. Then create a second network named “StorageAccess” When creating additional servers, make sure that you select the “StorageInternal” and “StorageAccess” networks.
- In the Advanced Options section under Disk Partition choose the “Manual” option so that we can partition and format the hard drive to our preferences.
Here are the addresses assigned to the servers that we created but yours my be different:
|
|
fileserver1 ServiceNet 10.10.10.1 (eth1) StorageAccess 192.168.4.1 (eth2) StorageInternal 192.168.3.1 (eth4) |
and:
|
|
fileserver2 ServiceNet 10.10.10.2 (eth1) StorageAccess 192.168.4.3 (eth2) StorageInternal 192.168.3.3 (eth4) |
2. Open SSH shell to servers – Open an SSH shell to each of the servers. Unless noted otherwise the following steps should be repeated on both servers.
3. Upgrade packages – Update repository listings and then upgrade all packages to latest versions:
4. Setup /etc/hosts – Add hostnames on the “StorageInternal” network for each server.
|
|
192.168.3.1 fileserver1-si 192.168.3.3 fileserver2-si |
5. Partition primary storage – Since we chose the “Manual” disk partition option, a 20GB root partition was created and the remainder of the primary storage was left unpartitioned. We need to partition this storage in preparation for later use in our LVM array.
Here’s our fdisk session
1 2 3 4 5 6 7 8 9 10 11 12 13 14 15 16 17 18 19 20 21 22 23 24 25 26 27 28 29 30 31 32 33 34 35 36 37 38 39 40 41 42 43 44 45 46 47 48 49 50 51 52 |
[root@fileserver1 ~]# <strong><span style="color: #ff0000;">fdisk /dev/xvda</span></strong> WARNING: DOS-compatible mode is deprecated. It's strongly recommended to switch off the mode (command 'c') and change display units to sectors (command 'u'). Command (m for help): <strong><span style="color: #ff0000;">p</span></strong> Disk /dev/xvda: 42.9 GB, 42949672960 bytes 151 heads, 48 sectors/track, 11573 cylinders Units = cylinders of 7248 * 512 = 3710976 bytes Sector size (logical/physical): 512 bytes / 512 bytes I/O size (minimum/optimal): 512 bytes / 512 bytes Disk identifier: 0x45d6a7da Device Boot Start End Blocks Id System /dev/xvda1 1 5787 20970496 83 Linux Command (m for help): <strong><span style="color: #ff0000;">n</span></strong> Command action e extended p primary partition (1-4) <strong><span style="color: #ff0000;">p</span></strong> Partition number (1-4): <strong><span style="color: #ff0000;">2</span></strong> First cylinder (5787-11573, default 5787): Using default value 5787 Last cylinder, +cylinders or +size{K,M,G} (5787-11573, default 11573): Using default value 11573 Command (m for help): <strong><span style="color: #ff0000;">p</span></strong> Disk /dev/xvda: 42.9 GB, 42949672960 bytes 151 heads, 48 sectors/track, 11573 cylinders Units = cylinders of 7248 * 512 = 3710976 bytes Sector size (logical/physical): 512 bytes / 512 bytes I/O size (minimum/optimal): 512 bytes / 512 bytes Disk identifier: 0x45d6a7da Device Boot Start End Blocks Id System /dev/xvda1 1 5787 20970496 83 Linux /dev/xvda2 5787 11573 20969032 83 Linux Command (m for help): <strong><span style="color: #ff0000;">w</span></strong> The partition table has been altered! Calling ioctl() to re-read partition table. WARNING: Re-reading the partition table failed with error 16: Device or resource busy. The kernel still uses the old table. The new table will be used at the next reboot or after you run partprobe(8) or kpartx(8) Syncing disks. [root@fileserver1 ~]# |
Since we changed the partition table on the root device a reboot is required to make the new partition visible. Continue once the reboot has been completed.
6. Add Cloud Block Storage – For this example, we need about 250GB of usable storage. There partition we just created has 20GB so we need to add about 225GB more using Cloud Block Storage.
a. Login to the cloud management console and drill down to the first server. Scroll down to the bottom of the page and click “Create Volume” in the “Storage Volumes” section.
b. Complete the Create Volume form. I like to include the hostname in the volume name along with an iterator so I used “fileserver1-1”. Set Type to “Standard” unless you need high performance and can afford the premium SSD dcrive. Enter the size which is 230GB for this example. Click “Create Volume” button to complete.
c. Click the “Attach Volume” button, select the volume and click the “Attach Volume” button.
d. Wait a few minutes for the storage to attach to the server.
From a terminal on the server use dmesg to see latest kernel messages:
At the bottom of the output you should see something like this:
|
|
blkfront: xvdb: barriers disabled xvdb: unknown partition table |
So you can see that the new volume has been attached to the “xvdb” device. Your device name may be different.
e. Now partition the new storage as one large block. Here’s our fdisk session:
1 2 3 4 5 6 7 8 9 10 11 12 13 14 15 16 17 18 19 20 21 22 23 24 25 26 27 28 29 30 31 32 33 34 35 36 37 38 39 40 41 42 43 44 45 46 47 48 49 50 51 52 |
[root@fileserver1 ~]# <span style="color: #ff0000;"><strong>fdisk /dev/xvdb</strong></span> Device contains neither a valid DOS partition table, nor Sun, SGI or OSF disklabel Building a new DOS disklabel with disk identifier 0xbb11777b. Changes will remain in memory only, until you decide to write them. After that, of course, the previous content won't be recoverable. Warning: invalid flag 0x0000 of partition table 4 will be corrected by w(rite) WARNING: DOS-compatible mode is deprecated. It's strongly recommended to switch off the mode (command 'c') and change display units to sectors (command 'u'). Command (m for help): <strong><span style="color: #ff0000;">p</span></strong> Disk /dev/xvdb: 247.0 GB, 246960619520 bytes 255 heads, 63 sectors/track, 30024 cylinders Units = cylinders of 16065 * 512 = 8225280 bytes Sector size (logical/physical): 512 bytes / 512 bytes I/O size (minimum/optimal): 512 bytes / 512 bytes Disk identifier: 0xbb11777b Device Boot Start End Blocks Id System Command (m for help): <span style="color: #ff0000;"><strong>n</strong></span> Command action e extended p primary partition (1-4) <strong><span style="color: #ff0000;">p</span></strong> Partition number (1-4): <strong><span style="color: #ff0000;">1</span></strong> First cylinder (1-30024, default 1): Using default value 1 Last cylinder, +cylinders or +size{K,M,G} (1-30024, default 30024): Using default value 30024 Command (m for help): <strong><span style="color: #ff0000;">p</span></strong> Disk /dev/xvdb: 247.0 GB, 246960619520 bytes 255 heads, 63 sectors/track, 30024 cylinders Units = cylinders of 16065 * 512 = 8225280 bytes Sector size (logical/physical): 512 bytes / 512 bytes I/O size (minimum/optimal): 512 bytes / 512 bytes Disk identifier: 0xbb11777b Device Boot Start End Blocks Id System /dev/xvdb1 1 30024 241167748+ 83 Linux Command (m for help): <strong><span style="color: #ff0000;">w</span></strong> The partition table has been altered! Calling ioctl() to re-read partition table. Syncing disks. [root@fileserver1 ~]# |
Repeat this process for the second server.
7. Setup LVM Partition – We now have 2 partitions:
/dev/xvda2 – 20GB
/dev/xvdb1 – 230GB
We’re going to use LVM to combine these two physical partitions into a single logical partition.
If you’re not familier with LVM then here’s a great tutorial:
A Beginner’s Guide To LVM
Here are the steps:
a. Install LVM and XFS:
|
|
yum install lvm2 xfsprogs |
b. Prepare the physical volume with pvcreate:
|
|
[root@fileserver1 ~]# pvcreate /dev/xvda2 /dev/xvdb1 Physical volume "/dev/xvda2" successfully created Physical volume "/dev/xvdb1" successfully created |
c. Add physical volumes to a “volume group” named “vg1”:
|
|
[root@fileserver1 ~]# vgcreate vg1 /dev/xvda2 /dev/xvdb1 Volume group "vg1" successfully created |
d. Create logical volume “gfs1” inside “vg1”:
|
|
[root@fileserver1 ~]# lvcreate --name gfs1 -l 100%FREE vg1 Logical volume "gfs1" created |
e. Format the logical partition with XFS:
|
|
[root@fileserver1 ~]# mkfs.xfs /dev/vg1/gfs1 meta-data=/dev/vg1/gfs1 isize=256 agcount=4, agsize=16383232 blks = sectsz=512 attr=2, projid32bit=0 data = bsize=4096 blocks=65532928, imaxpct=25 = sunit=0 swidth=0 blks naming =version 2 bsize=4096 ascii-ci=0 log =internal log bsize=4096 blocks=31998, version=2 = sectsz=512 sunit=0 blks, lazy-count=1 realtime =none extsz=4096 blocks=0, rtextents=0 |
f. Create a mount point for the partition:
g. Add to /etc/fstab
|
|
/dev/vg1/gfs1 /data xfs defaults 1 2 |
h. Mount the new partition:
Repeat this step on both servers.
8. Install glusterfs yum repository – Run the following command to add the gluster repository to yum:
|
|
wget -P /etc/yum.repos.d http://download.gluster.org/pub/gluster/glusterfs/LATEST/EPEL.repo/glusterfs-epel.repo |
9. Install glusterfs software – Use the following command to install the cluster software:
|
|
yum install glusterfs{-fuse,-server} |
10. Confirm gluster version – Make sure you have the correct version:
|
|
[root@fileserver1 ~]# glusterfsd --version glusterfs 3.4.0 built on Aug 6 2013 11:17:05 |
10. Firewall configuration – Next we need to get a basic firewall configured to protect the servers. CentOS uses bare IPtables so we just need to run the following:
|
|
/sbin/iptables -I INPUT 5 -i eth4 -j ACCEPT |
This rule allows all traffic on eth4 which is the “StorageInternal” network.
Next we need to allow connections from clients. We’re going to restrict access based on IP address. You’ll need to repeat these commands for each different client. Let’s assume that we have a client with an IP address of x.x.x.x then add the following rules:
|
|
# Gluster Daemon /sbin/iptables -I INPUT 5 -p tcp --dport 24007 -s x.x.x.x -j ACCEPT # one port for each brick in a volume /sbin/iptables -I INPUT 5 -p tcp --dport 24009 -s x.x.x.x -j ACCEPT /sbin/iptables -I INPUT 5 -p tcp --dport 24010 -s x.x.x.x -j ACCEPT # inline Gluster NFS server /sbin/iptables -I INPUT 5 -p tcp --dport 34864 -s x.x.x.x -j ACCEPT /sbin/iptables -I INPUT 5 -p tcp --dport 34866 -s x.x.x.x -j ACCEPT /sbin/iptables -I INPUT 5 -p tcp --dport 34867 -s x.x.x.x -j ACCEPT # portmapper /sbin/iptables -I INPUT 5 -p tcp --dport 111 -s x.x.x.x -j ACCEPT /sbin/iptables -I INPUT 5 -p udp --dport 111 -s x.x.x.x -j ACCEPT |
Now commit the changes with:
|
|
/sbin/service iptables save |
11. Start glusterd – Set glusterd to start on boot and start it for the first time:
|
|
/sbin/chkconfig --level 345 glusterd on /sbin/service glusterd start |
11. Add nodes to cluster – On fileserver1, run this command to register fileserver2 to the trusted storage pool:
|
|
gluster peer probe fileserver2-si |
The results should look like this:
|
|
root@fileserver1:~# gluster peer probe fileserver2-si Probe successful |
12. Check cluster status – On each node run “gluster peer status” and confirm the peer addresses. Here’s fileserver1:
|
|
root@fileserver1:~# gluster peer status Number of Peers: 1 Hostname: fileserver2-si Uuid: 128a6848-9681-4ef4-ac34-283875755ccd State: Peer in Cluster (Connected) |
and here’s fileserver2:
|
|
root@fileserver2:~# gluster peer status Number of Peers: 1 Hostname: 192.168.3.1 Uuid: 79a0c485-7d7f-4f90-9956-61de48074f84 State: Peer in Cluster (Connected) |
13. Create volume – Next we need to create the actual GlusterFS volume:
|
|
gluster volume create datavol replica 2 \ transport tcp fileserver1-si:/data fileserver2-si:/data |
You should get back a response like:
|
|
Creation of volume datavol has been successful. Please start the volume to access data. |
14. Start the volume – Now start the volume to make it available to clients with:
|
|
gluster volume start datavol |
You should get a response like:
|
|
Starting volume datavol has been successful |
The howto by Falko Timme mentioned at the start of this article gives some useful advice and tips on how to troubleshoot if the volume fails to create or start.
15. Verify volume status – Check the status of the volume with:
You should get a response similar to:
|
|
Volume Name: datavol Type: Replicate Volume ID: 3107a27c-2f70-43da-8ce4-ad270641e314 Status: Started Number of Bricks: 1 x 2 = 2 Transport-type: tcp Bricks: Brick1: fileserver1-si:/data Brick2: fileserver2-si:/data |
16. Allow client access – We want to allow all clients on the “StorageAccess” network access to the cluster:
|
|
gluster volume set datavol auth.allow 192.168.4.* |
Now show volume info again:
And you should get:
|
|
Volume Name: datavol Type: Replicate Volume ID: 3107a27c-2f70-43da-8ce4-ad270641e314 Status: Started Number of Bricks: 1 x 2 = 2 Transport-type: tcp Bricks: Brick1: fileserver1-si:/data Brick2: fileserver2-si:/data Options Reconfigured: auth.allow: 192.168.4.* |
Setup on the server is complete. Now it’s time to add clients.
Part 2 – Client Setup
We’ll assume that the first client is also going to be CentOS.
1. Install glusterfs yum repository – Run the following command to add the gluster repository to yum:
|
|
wget -P /etc/yum.repos.d http://download.gluster.org/pub/gluster/glusterfs/LATEST/EPEL.repo/glusterfs-epel.repo |
2. Install glusterfs client – Execute the following command
|
|
yum install glusterfs-client |
3. Confirm version – Verify that you have the correct version installed:
|
|
root@db1:~# glusterfs --version glusterfs 3.3.2 built on Jul 21 2013 16:38:01 |
4. Create mount point – Create a directory that will be the mount point for the gluster partition:
5. Setup /etc/hosts – Add the following entries to /etc/hosts:
|
|
192.168.4.1 fileserver1-sa fileserver1-si 192.168.4.3 fileserver2-sa fileserver2-si |
Notice that we’re mapping both the StorageInternal and StorageAccess network names to the same IP addreses on the StorageAccess network.
6. Mount volume – Execute the command to mount the gluster volume:
|
|
mount -t glusterfs fileserver1-sa:/datavol /data |
7. Edit /etc/fstab – Add this line to /etc/fstab to make the mount start automatically on boot:
|
|
fileserver1-sa:/datavol /data glusterfs defaults 0 0 |
And that completes the client setup procedure. You now have a working GlusterFS storage cluster and a connected client.
Comments and suggestions are welcomed.