# enter config mode
config
# ***********************
# *** FIREWALL CONFIG ***
# ***********************
# activate stateful inspection
set firewall state-policy established action 'accept'
set firewall state-policy related action 'accept'
# global firewall rules
set firewall all-ping 'enable'
set firewall broadcast-ping 'disable'
set firewall ipv6-receive-redirects 'disable'
set firewall ipv6-src-route 'disable'
set firewall ip-src-route 'disable'
set firewall log-martians 'enable'
set firewall receive-redirects 'disable'
set firewall send-redirects 'enable'
set firewall source-validation 'disable'
set firewall syn-cookies 'enable'
# Create new firewall named 'protect-vyatta' that will be applied
# to local traffic destined for the vRouter.
edit firewall name protect-vyatta
# drop all by default
set default-action 'drop'
# allow IKE and ESP for IPsec
set rule 100 action 'accept'
set rule 100 destination port '500'
set rule 100 protocol 'udp'
set rule 200 action 'accept'
set rule 200 protocol 'esp'
# allow LT2P over IPsec
set rule 210 action 'accept'
set rule 210 destination port '1701'
set rule 210 ipsec 'match-ipsec'
set rule 210 protocol 'udp'
# NAT traversal
set rule 250 action 'accept'
set rule 250 destination port '4500'
set rule 250 protocol 'udp'
# deter SSH brute force
set rule 300 action 'drop'
set rule 300 destination port '22'
set rule 300 protocol 'tcp'
set rule 300 recent count '3'
set rule 300 recent time '30'
set rule 300 state new 'enable'
# Allow SSL to vRouter
# You might also want to add source IP restrictions to this rule.
set rule 310 action 'accept'
set rule 310 destination port '22'
set rule 310 protocol 'tcp'
# Allow HTTPS to vRouter web interface
# Consider adding source IP restrictions or leaving this rule
# out completely if you're not going to use the web interface.
set rule 502 action 'accept'
set rule 502 destination port '443'
set rule 502 protocol 'tcp'
# allow icmp
set rule 900 action 'accept'
set rule 900 description 'allow icmp'
set rule 900 protocol 'icmp'
# return to base config level
exit
# assign local firewall to interface
set interfaces ethernet eth0 firewall local name 'protect-vyatta'
# setup firewall for public interface
set firewall name untrusted default-action 'drop'
set firewall name untrusted description 'deny traffic from internet'
edit firewall name untrusted
# allow http to web server
# needed in conjunction with destination NAT rules
set rule 502 action 'accept'
set rule 502 destination port '80'
set rule 502 protocol 'tcp'
exit
# Assign 'untrusted' firewall to incoming packets on eth0
set interfaces ethernet eth0 firewall in name 'untrusted'
# ******************
# *** NAT CONFIG ***
# ******************
# Masquerade private network behind public interface
# Replace [y.y.y.y] with network address of
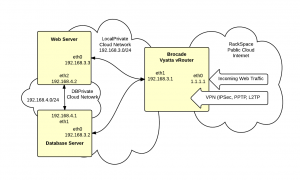
# LocalPrivate (192.168.0.3 in this example)
set nat source rule 10 outbound-interface 'eth0'
set nat source rule 10 protocol 'all'
set nat source rule 10 source address '[y.y.y.y]/24'
set nat source rule 10 translation address 'masquerade'
# Destination NAT for external port 80 to internal web server
# Replace [x.x.x.x] with the public address of the vRouter
# Replace [z.z.z.z] with LocalPrivate address of web
# server (192.168.3.3 in this example)
# Add rules as necessary for additional ports.
set nat destination rule 10 inbound-interface eth0
set nat destination rule 10 destination address [x.x.x.x]
set nat destination rule 10 destination port http
set nat destination rule 10 protocol tcp
set nat destination rule 10 translation address [z.z.z.z]
# ******************
# *** VPN CONFIG ***
# ******************
# assign ipsec to eth0
set vpn ipsec ipsec-interfaces interface eth0
# turn on nat traversal on all networks
set vpn ipsec nat-traversal enable
set vpn ipsec nat-networks allowed-network 0.0.0.0/0
# Replace [x.x.x.x] with the public address of the vRouter
set vpn l2tp remote-access outside-address [x.x.x.x]
# We draw addresses for VPN clients from the LocalPrivate subnet. This allows
# VPN clients to do split tunneling without adding static routes
set vpn l2tp remote-access client-ip-pool start 192.168.3.100
set vpn l2tp remote-access client-ip-pool stop 192.168.3.200
# Replace [PRESHARED SECRET] with your own preshared secret
set vpn l2tp remote-access ipsec-settings authentication \
mode pre-shared-secret
set vpn l2tp remote-access ipsec-settings authentication \
pre-shared-secret [PRESHARED SECRET]
# Users will be authenticated against a local database stored on the vRouter.
set vpn l2tp remote-access authentication mode local
# Replace [USERNAME] and [PASSWORD] with the username/password for your
# first remote user. Repeat to add additional users.
set vpn l2tp remote-access authentication local-users \
username [USERNAME] password [PASSWORD]
# commit and save changes
commit
save
# return to operational mode
exit

