
 We want to build a high-availability storage cluster based on GlusterFS using RackSpace Cloud Servers on Ubuntu. Additionally we want to use RackSpace Cloud Networks to provide private networks for replication and cluster access.
There’s a great doc by Falko Timme on Howto Forge titled:
We’re going to follow this doc with a few modifications for Cloud Networks and using a newer version of Gluster.
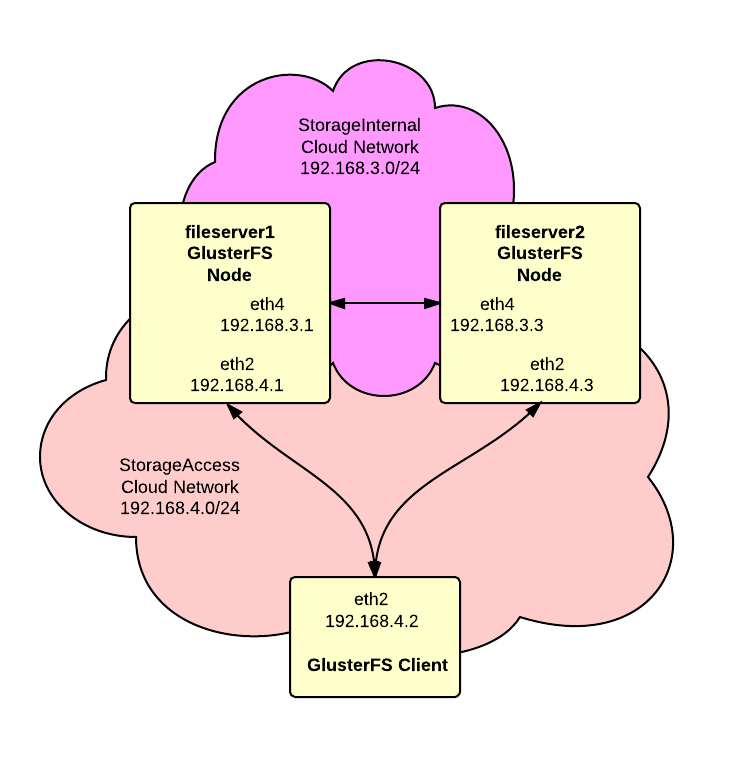
As shown in the diagram, we’ll have two Cloud Networks, one for replication between the servers and one for access by clients to the storage.
Part 1 – Server Setup
1. Create servers and networks – Login to your RackSpace Cloud account and create two server following these guidelines:
- Make sure you choose a Next Gen region for the servers.
- For the Image choose “Ubuntu 13.04 (Raring Ringtail)”
- Select a size based on your requirements. We’re using 1GB for this article.
- In the Networks section, when creating the first server, click the “Create Network” button and add a network named “StorageInternal”. Then create a second network named “StorageAccess” When creating additional servers, make sure that you select the “StorageInternal” and “StorageAccess” networks.
- If you need more storage then is included in the base image or if you want higher performance the consider using RackSpace Cloud Block Storage. This is not covered in this article.
Here are the addresses assigned to the servers that we created but yours my be different:
|
1 2 3 4 |
fileserver1 ServiceNet 10.10.10.1 (eth1) StorageAccess 192.168.4.1 (eth2) StorageInternal 192.168.3.1 (eth4) |
and:
|
1 2 3 4 |
fileserver2 ServiceNet 10.10.10.2 (eth1) StorageAccess 192.168.4.3 (eth2) StorageInternal 192.168.3.3 (eth4) |
2. Open SSH shell to servers – Open an SSH shell to each of the servers. Unless noted otherwise the following steps should be repeated on both servers.
3. Upgrade packages – Update repository listings and then upgrade all packages to latest versions:
|
1 2 |
apt-get update apt-get upgrade |
4. Setup /etc/hosts – Add hostnames on the “StorageInternal” network for each server.
|
1 2 |
192.168.3.1 fileserver1-si 192.168.3.3 fileserver2-si |
5. Install glusterfs PPA repository – The default apt repositories for Ubuntu only offer version 3.2.7 of GlusterFS. We wanted a newer version so we’ll be modifying the install process to use the PPA distribution. Execute the following commands
|
1 2 3 4 |
apt-get install python-software-properties apt-get install software-properties-common add-apt-repository ppa:semiosis/ubuntu-glusterfs-3.3 apt-get update |
6. Install glusterfs server – Use this command to install:
|
1 |
apt-get install glusterfs-server |
7. Confirm gluster version – Make sure you have the correct version:
|
1 2 |
root@fileserver1:~# glusterfsd --version glusterfs 3.3.2 built on Jul 21 2013 16:38:01 |
If you get an older version then you probably forgot to run “apt-get update”. Just remove the older package, update and reinstall:
|
1 2 3 |
apt-get remove glusterfs-server apt-get update apt-get install glusterfs-server |
8. Firewall configuration – Next we need to get a basic firewall configured to protect the servers. Ubuntu includes UFW (Uncomplicated Firewall) so we’ll go with that:
|
1 2 3 4 5 6 7 8 9 10 11 |
# allow incoming ssh ufw allow 22 # allow all connections on "StorageInternal" network ufw allow in on eth4 # allow all connections on "StorageAccess" network ufw allow in on eth2 # turn on the firewall ufw enable |
9. Add nodes to cluster – On fileserver1, run this command to register fileserver2 to the trusted storage pool:
|
1 |
gluster peer probe fileserver2-si |
The results should look like this:
|
1 2 |
root@fileserver1:~# gluster peer probe fileserver2-si Probe successful |
10. Check cluster status – On each node run “gluster peer status” and confirm the peer addresses. Here’s fileserver1:
|
1 2 3 4 5 6 |
root@fileserver1:~# gluster peer status Number of Peers: 1 Hostname: fileserver2-si Uuid: 128a6848-9681-4ef4-ac34-283875755ccd State: Peer in Cluster (Connected) |
and here’s fileserver2:
|
1 2 3 4 5 6 |
root@fileserver2:~# gluster peer status Number of Peers: 1 Hostname: 192.168.3.1 Uuid: 79a0c485-7d7f-4f90-9956-61de48074f84 State: Peer in Cluster (Connected) |
11. Create volume – Next we need to create the actual GlusterFS volume:
|
1 2 |
gluster volume create datavol replica 2 \ transport tcp fileserver1-si:/data fileserver2-si:/data |
You should get back a response like:
|
1 2 |
Creation of volume datavol has been successful. Please start the volume to access data. |
12. Start the volume – Now start the volume to make it available to clients with:
|
1 |
gluster volume start datavol |
You should get a response like:
|
1 |
Starting volume datavol has been successful |
The howto by Falko Timme mentioned at the start of this article gives some useful advice and tips on how to troubleshoot if the volume fails to create or start.
13. Verify volume status – Check the status of the volume with:
|
1 |
gluster volume info |
You should get a response similar to:
|
1 2 3 4 5 6 7 8 9 |
Volume Name: datavol Type: Replicate Volume ID: 3107a27c-2f70-43da-8ce4-ad270641e314 Status: Started Number of Bricks: 1 x 2 = 2 Transport-type: tcp Bricks: Brick1: fileserver1-si:/data Brick2: fileserver2-si:/data |
14. Allow client access – We want to allow all clients on the “StorageAccess” network access to the cluster:
|
1 |
gluster volume set datavol auth.allow 192.168.4.* |
Now show volume info again:
|
1 |
gluster volume info |
And you should get:
|
1 2 3 4 5 6 7 8 9 10 11 |
Volume Name: datavol Type: Replicate Volume ID: 3107a27c-2f70-43da-8ce4-ad270641e314 Status: Started Number of Bricks: 1 x 2 = 2 Transport-type: tcp Bricks: Brick1: fileserver1-si:/data Brick2: fileserver2-si:/data Options Reconfigured: auth.allow: 192.168.4.* |
Setup on the server is complete. Now it’s time to add clients.
Part 2 – Client Setup
1. Install glusterfs PPA repository – Execute the following commands
|
1 2 3 4 |
apt-get install python-software-properties apt-get install software-properties-common add-apt-repository ppa:semiosis/ubuntu-glusterfs-3.3 apt-get update |
2. Install glusterfs client – Execute the following command:
|
1 |
apt-get install glusterfs-client |
3. Confirm version – Verify that you have the correct version installed:
root@db1:~# glusterfs –version
glusterfs 3.3.2 built on Jul 21 2013 16:38:01
4. Create mount point – Create a directory that will be the mount point for the gluster partition:
|
1 |
mkdir /data |
5. Setup /etc/hosts – Add the following entries to /etc/hosts:
|
1 2 |
192.168.4.1 fileserver1-sa fileserver1-si 192.168.4.3 fileserver2-sa fileserver2-si |
Notice that we’re mapping both the StorageInternal and StorageAccess network names to the same IP addreses on the StorageAccess network.
6. Mount volume – Execute the command to mount the gluster volume:
|
1 |
mount -t glusterfs fileserver1-sa:/datavol /data |
7. Edit /etc/fstab – Add this line to /etc/fstab to make the mount start automatically on boot:
|
1 |
fileserver1-sa:/datavol /data glusterfs defaults 0 0 |
And that completes the client setup procedure. You now have a working GlusterFS storage cluster and a connected client.
Comments and suggestions are welcomed.