
We’re going to build a highly secure hosting environment on RackSpace Cloud using Cloud Networks and the new Brocade Vyatta vRouter image. The diagrams shows the target configuration:
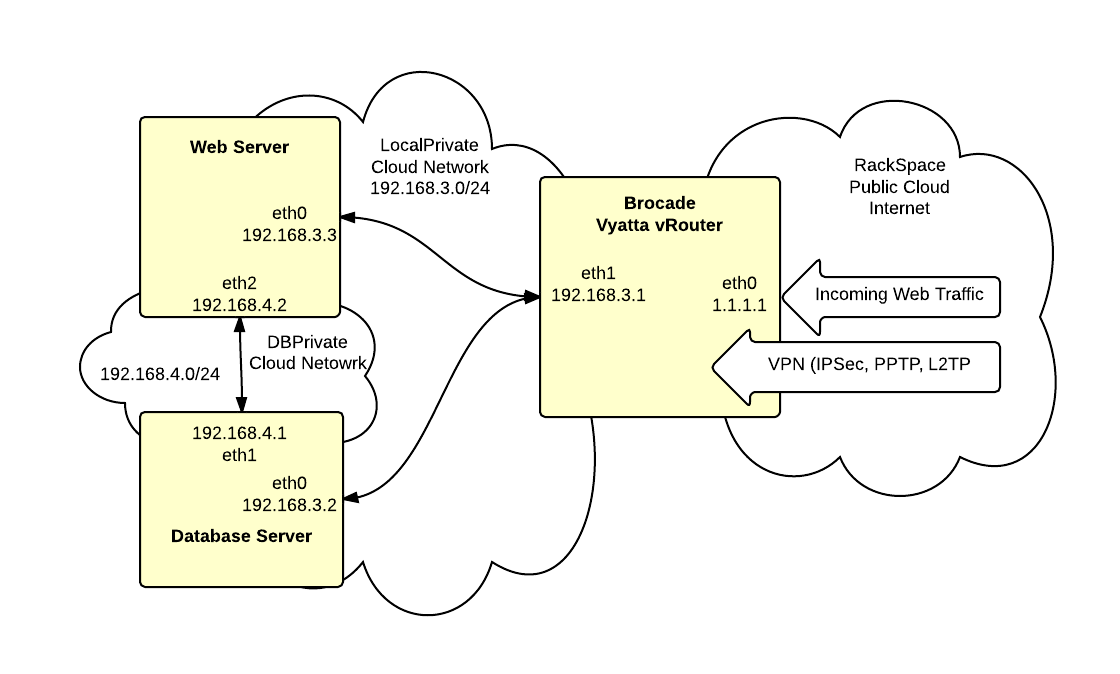
There are 4 networks:
Public – this is the RackSpace Public Cloud/Internet network. The vRouter connects via eth0 to this network with public address of 1.1.1.1
LocalPrivate – this is a private Cloud Network that connects the vRouter and the servers. This network uses the private 192.168.3.0/24 subnet.
DBPrivate – this is a private Cloud Network that connects the web and database servers. This network uses the private 192.168.4.0/24 subnet.
Service – this is RackSpaces multi-tenent management network. This network is not being used and is not shown in the diagram.
On these networks are three servers:
Brocade Vyatta vRouter – this device provides a router, firewall and VPN termination point
Web Server – provides hosting for the web application.
Database Server – provides hosting for MySQL database used by web application
The Web and Database servers are not directly connected to the Internet. Instead all traffic passes through the vRouter. The vRouter provides a stateful inspection firewall to control access. There is also a private network (DBPrivate) between the web and database server.
Part 1 – Create Networks & Servers
To get started, login to your RackSpace Cloud account.
1. Verify that your account is enable for Cloud Networks and Brocade Vyatta vRouter. Go to Servers and click the Add Server button. Look in the list of available images and find the Brocade Vyatta vRouter. If it is not listed then open a support ticket and request access. Look towards the bottom of the New Server form and find the Cloud Networks section. If you don’t see this section then open a support ticket requesting access to Cloud Networks. Once you have verified that both Cloud Networks and Brocade Vyatta vRouter are available on your account then you can proceed to the next step.
2. Create a new server using the Brocade Vyatta vRouter image. The minimum size for the server should be 1GB. You can resize up later on as needed. You can not resize down. In the Cloud Networks section at the bottom of the form, add a new network named “LocalPrivate”.
3. Create the new database server using the latest CentOS 6.x image with at least 1GB of memory. In the Cloud Networks section, create a new network named “DBPrivate”. Also add the database server to the previously created “LocalPrivate” network.
4. Create the new web server using the latest CentOS 6.x image with at least 1GB of memory. In the Cloud Networks section, add the web server to the previously created “DBPrivate” and the “LocalPrivate” networks.
Take note the root passwords and IP addresses assigned to each server as they are created.
Part 2 – Configure vRouter
Connect to the vRouter with SSH. The login will be username “vyatta” and the password set when the server was created.
Execute the following commands in order. Be careful to replace bracketted items with your actual configuration values. Most lines can be copied and pasted to the vRouter including the comments.
|
1 2 3 4 5 6 7 8 9 10 11 12 13 14 15 16 17 18 19 20 21 22 23 24 25 26 27 28 29 30 31 32 33 34 35 36 37 38 39 40 41 42 43 44 45 46 47 48 49 50 51 52 53 54 55 56 57 58 59 60 61 62 63 64 65 66 67 68 69 70 71 72 73 74 75 76 77 78 79 80 81 82 83 84 85 86 87 88 89 90 91 92 93 94 95 96 97 98 99 100 101 102 103 104 105 106 107 108 109 110 111 112 113 114 115 116 117 118 119 120 121 122 123 124 125 126 127 128 129 130 131 132 133 134 135 136 137 138 139 140 141 142 143 144 145 146 147 148 149 150 151 152 153 154 155 156 157 158 |
# enter config mode config # *********************** # *** FIREWALL CONFIG *** # *********************** # activate stateful inspection set firewall state-policy established action 'accept' set firewall state-policy related action 'accept' # global firewall rules set firewall all-ping 'enable' set firewall broadcast-ping 'disable' set firewall ipv6-receive-redirects 'disable' set firewall ipv6-src-route 'disable' set firewall ip-src-route 'disable' set firewall log-martians 'enable' set firewall receive-redirects 'disable' set firewall send-redirects 'enable' set firewall source-validation 'disable' set firewall syn-cookies 'enable' # Create new firewall named 'protect-vyatta' that will be applied # to local traffic destined for the vRouter. edit firewall name protect-vyatta # drop all by default set default-action 'drop' # allow IKE and ESP for IPsec set rule 100 action 'accept' set rule 100 destination port '500' set rule 100 protocol 'udp' set rule 200 action 'accept' set rule 200 protocol 'esp' # allow LT2P over IPsec set rule 210 action 'accept' set rule 210 destination port '1701' set rule 210 ipsec 'match-ipsec' set rule 210 protocol 'udp' # NAT traversal set rule 250 action 'accept' set rule 250 destination port '4500' set rule 250 protocol 'udp' # deter SSH brute force set rule 300 action 'drop' set rule 300 destination port '22' set rule 300 protocol 'tcp' set rule 300 recent count '3' set rule 300 recent time '30' set rule 300 state new 'enable' # Allow SSL to vRouter # You might also want to add source IP restrictions to this rule. set rule 310 action 'accept' set rule 310 destination port '22' set rule 310 protocol 'tcp' # Allow HTTPS to vRouter web interface # Consider adding source IP restrictions or leaving this rule # out completely if you're not going to use the web interface. set rule 502 action 'accept' set rule 502 destination port '443' set rule 502 protocol 'tcp' # allow icmp set rule 900 action 'accept' set rule 900 description 'allow icmp' set rule 900 protocol 'icmp' # return to base config level exit # assign local firewall to interface set interfaces ethernet eth0 firewall local name 'protect-vyatta' # setup firewall for public interface set firewall name untrusted default-action 'drop' set firewall name untrusted description 'deny traffic from internet' edit firewall name untrusted # allow http to web server # needed in conjunction with destination NAT rules set rule 502 action 'accept' set rule 502 destination port '80' set rule 502 protocol 'tcp' exit # Assign 'untrusted' firewall to incoming packets on eth0 set interfaces ethernet eth0 firewall in name 'untrusted' # ****************** # *** NAT CONFIG *** # ****************** # Masquerade private network behind public interface # Replace [y.y.y.y] with network address of # LocalPrivate (192.168.0.3 in this example) set nat source rule 10 outbound-interface 'eth0' set nat source rule 10 protocol 'all' set nat source rule 10 source address '[y.y.y.y]/24' set nat source rule 10 translation address 'masquerade' # Destination NAT for external port 80 to internal web server # Replace [x.x.x.x] with the public address of the vRouter # Replace [z.z.z.z] with LocalPrivate address of web # server (192.168.3.3 in this example) # Add rules as necessary for additional ports. set nat destination rule 10 inbound-interface eth0 set nat destination rule 10 destination address [x.x.x.x] set nat destination rule 10 destination port http set nat destination rule 10 protocol tcp set nat destination rule 10 translation address [z.z.z.z] # ****************** # *** VPN CONFIG *** # ****************** # assign ipsec to eth0 set vpn ipsec ipsec-interfaces interface eth0 # turn on nat traversal on all networks set vpn ipsec nat-traversal enable set vpn ipsec nat-networks allowed-network 0.0.0.0/0 # Replace [x.x.x.x] with the public address of the vRouter set vpn l2tp remote-access outside-address [x.x.x.x] # We draw addresses for VPN clients from the LocalPrivate subnet. This allows # VPN clients to do split tunneling without adding static routes set vpn l2tp remote-access client-ip-pool start 192.168.3.100 set vpn l2tp remote-access client-ip-pool stop 192.168.3.200 # Replace [PRESHARED SECRET] with your own preshared secret set vpn l2tp remote-access ipsec-settings authentication \ mode pre-shared-secret set vpn l2tp remote-access ipsec-settings authentication \ pre-shared-secret [PRESHARED SECRET] # Users will be authenticated against a local database stored on the vRouter. set vpn l2tp remote-access authentication mode local # Replace [USERNAME] and [PASSWORD] with the username/password for your # first remote user. Repeat to add additional users. set vpn l2tp remote-access authentication local-users \ username [USERNAME] password [PASSWORD] # commit and save changes commit save # return to operational mode exit |
Part 3 – Configure VPN Client
Next you can configure a client workstation. Here’s the procedure to configure a Windows client to connect to the VPN:
http://blogs.reliablepenguin.com/2013/08/22/windows-l2tpipsec-client-config
These instructions include an optional step to enable split tunneling. You’ll most likely want to complete this step so that only traffic for the secure hosts is routed on the VPN.
Part 4 – Configure Web Server
Initially the web server will not have a viable default gateway so it will not be accessible from the Internet or the VPN. So you’ll need to SSH to the vRouter and then SSH again into the web server. Open an SSH terminal to the vRouter and login as user “vyatta”. Now ssh from here to the web server:
|
1 |
ssh -l root 192.168.3.3 |
We need to set a default gateway pointing to the vRouter. So edit /etc/sysconfig/network-scripts-ifcfg-eth2 and add this line to the bottom:
|
1 |
GATEWAY=192.168.3.1 |
If you addresses or interfaces are numbered differently then you’ll need to adjust accordingly. The key issue is that the webserver needs to point to the internal LocalPrivate interface on the vRouter for it’s default gateway in order to route to the Internet.
Part 5 – Configure Database Server
We need to set a default gateway pointing to the vRouter. So edit /etc/sysconfig/network-scripts-ifcfg-eth1 and add this line to the bottom:
|
1 |
GATEWAY=192.168.3.1 |
If you addresses or interfaces are numbered differently then you’ll need to adjust accordingly. The key issue is that the database server needs to point to the internal LocalPrivate interface on the vRouter for it’s default gateway in order to route to the Internet.
Notes
- For database access from the webserver, make sure you use the DBPrivate network. I like to add an entry to the /etc/hosts file on the webserver that maps a name to the correct address on the database server like this:
1192.168.4.1 db01