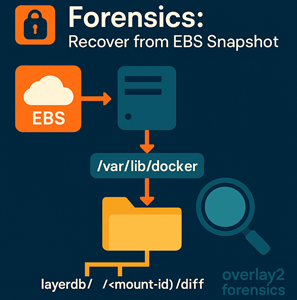
There’s a special kind of panic that hits when a Docker host vanishes. One moment your app is humming along inside containers; the next, the EC2 instance is gone — terminated, corrupted, or simply unreachable. You might still have an EBS snapshot from a backup or auto-snapshot policy, but Docker itself won’t start, and all you’ve got is a pile of raw files.
That’s okay. Those files are gold.
Docker’s overlay2 storage driver leaves behind a complete record of every container’s filesystem, metadata, and environment. If you know where to look, you can reconstruct the app from that snapshot — no running daemon required.
This guide walks you through the forensic recovery process step by step, showing how to extract code, config, and secrets directly from disk and even spin up a working replacement container.
Scenario & prerequisites
Here’s what we’re working with:
- You’ve mounted a snapshot of a Docker host’s EBS volume to a new EC2 instance (for example, at
/mnt/snap). - You do not have Docker running on the recovery host — and you don’t need it.
- We’ll assume Docker’s data root was the default
/var/lib/docker, now accessible under/mnt/snap/var/lib/docker.
The goal isn’t to rebuild the entire system exactly as it was, but to extract the application’s state and configuration so you can run it again or investigate what it was doing. Think of this as digital archaeology for containers.
A quick tour of Docker’s filesystem
Before diving in, it helps to understand what’s inside /var/lib/docker.
Docker organizes everything under this root:
| Path | What it stores |
|---|---|
containers/ |
One directory per container: configs, logs, and runtime settings |
image/overlay2/layerdb/ |
Internal mapping from container IDs to their mount layers |
overlay2/ |
Actual filesystem layers (read-only image layers and writable “diff” layers) |
volumes/ |
Named and anonymous volumes with user data (<name>/_data) |
If you can find your target container’s ID and follow the links between these directories, you can literally walk down into the container’s live filesystem as it existed at snapshot time.
Step 1: Identify the target container
When a host ran multiple containers, the first step is to figure out which one contained your app. Each container has a unique ID (a long hex string), but inside its folder lives config.v2.json, which lists friendly names and image references.
Run:
|
1 2 3 |
BASE=/mnt/snap/var/lib/docker grep -R '"Image"\|"Name"' $BASE/containers/*/config.v2.json | head |
This surfaces lines like:
|
1 2 |
/mnt/snap/.../containers/8c4.../config.v2.json:"Name":"myapp" |
Once you find the right one, dig deeper:
|
1 2 3 |
jq '.Name, .Config.Image, .Config.Env, .Config.Entrypoint, .Config.Cmd' \ $BASE/containers/<CID>/config.v2.json |
You’ll see the container’s name, base image, startup commands, and environment variables. This file is essentially the DNA of your container — everything Docker knew about how to launch it.
Why it matters: by identifying this container, you can later map its writable layer and reconstruct its runtime environment.
Step 2: Check mounts vs. binds
Next, we need to know where the data lived. Containers may use Docker volumes or bind mounts to persist data outside the image. If your app wrote to a mounted volume, its data won’t be in the overlay2 filesystem — it’ll be under /var/lib/docker/volumes instead.
Check for mounts and binds:
|
1 2 3 4 |
jq -r '.Mounts[]?|[.Type,.Name,.Source,.Destination]|@tsv' \ $BASE/containers/<CID>/config.v2.json jq -r '.Binds[]?' $BASE/containers/<CID>/hostconfig.json |
If you see entries here, note them — you’ll recover those separately later.
If nothing shows up, that means the container wrote directly into its own filesystem layer, and that’s what we’ll extract next.
Understanding mounts early saves time: you’ll know whether your app’s data was ephemeral or persisted to a dedicated volume.
Step 3: Resolve the writable root (the big unlock)
Every running container gets its own writable layer on top of the base image — this is where log files, generated assets, and runtime changes live. In overlay2, that writable layer is stored under a directory named after a mount ID.
To find it:
|
1 2 3 4 |
MID=$(cat $BASE/image/overlay2/layerdb/mounts/<CID>/mount-id) ROOTFS="$BASE/overlay2/$MID/diff" ls -la "$ROOTFS" |
If the file doesn’t exist, check older Docker layouts:
|
1 2 |
cat $BASE/containers/<CID>/mount-id |
or extract the UpperDir directly from config:
|
1 2 |
jq -r '.GraphDriver.Data.UpperDir' $BASE/containers/<CID>/config.v2.json |
That diff directory is the live filesystem of the container as it existed when the snapshot was taken. You’re looking at / inside the container — /app, /etc, /var, everything.
This is where you’ll find the actual application code and runtime files.
Step 4: Extract app code & secrets
Now that you know where the container’s writable layer lives, copy out the application files. Most modern Dockerized apps keep their code in /app, /srv/app, or /usr/src/app.
|
1 2 3 |
mkdir -p /root/recovered-app rsync -a "$ROOTFS/app/" /root/recovered-app/ |
While you’re in there, check for .env files or configuration templates. These often reveal environment variables that weren’t baked into the image.
⚠ Security note:
Open config.v2.json and you’ll likely see an array of environment variables under .Config.Env[]. These can contain passwords, tokens, or database URLs. Treat them as sensitive and rotate them after recovery — they were effectively plaintext in memory.
This step is the heart of the recovery: by pulling the writable filesystem, you’re recovering the “personality” of the container — its app code, local changes, and configuration files.
Step 5: Reconstruct how the app starts
A recovered filesystem is great, but we also need to know how the app was started. Docker tracks the entrypoint and command that were used to launch the container, plus its working directory and exposed ports.
From config.v2.json:
|
1 2 3 |
jq '.Config.Entrypoint, .Config.Cmd, .Config.WorkingDir, .Config.ExposedPorts' \ $BASE/containers/<CID>/config.v2.json |
These fields tell you whether the app launched via gunicorn, node, or some init wrapper like s6 or supervisord.
If you see something like [/init], inspect /etc/s6/ or /etc/services.d/ in the filesystem to find the real start command.
Understanding this startup sequence lets you build a minimal docker run or Compose replacement without guesswork.
Step 6: Rehydrate with a quick docker run
Now that you’ve got the files and startup command, you can test the app in a sandbox. The goal isn’t production perfection yet — just to confirm the app runs.
Example:
|
1 2 3 4 5 6 7 8 |
docker run -d --name recovered \ -p 8000:8000 \ -v /root/recovered-app:/app \ -w /app \ --env-file /root/recovered-app/.env/production.env \ python:3.7 \ bash -lc 'pip install -r requirements.txt && gunicorn myproj.wsgi:application -b 0.0.0.0:8000' |
If .Config.Image showed something like company/webapp:2.3, use that image to stay authentic.
The key idea: by mirroring the recovered environment — same code, same working directory, same env vars — you can spin up the original app from scratch, even on a brand-new host.
Step 7: Handling volumes and persistent data
If your earlier mount check showed named or anonymous volumes, don’t forget them. They’re stored under:
|
1 2 |
$BASE/volumes/<volume-name>/_data/ |
Each _data directory is the content of that volume. You can mount it into your new container at the correct destination:
|
1 2 |
docker run -v /mnt/snap/var/lib/docker/volumes/mydata/_data:/var/lib/postgresql/data ... |
This is especially important for databases and file uploads. Without reattaching these volumes, your restored app might run but have empty data directories.
Step 8: Troubleshooting & integrity notes
Recovering containers from static snapshots isn’t perfect, and that’s okay. A few things to keep in mind:
- Database integrity: The snapshot captures files mid-write. Expect WAL or journal recovery when starting databases again.
- Permissions: UID/GID mismatches are common when copying files out of containers. Match the container user with
stator check/etc/passwdinside the rootfs. - Security contexts: SELinux or AppArmor attributes don’t survive easily. You may need to reset contexts (
restorecon) when reusing the data. - Other storage drivers: This guide assumes
overlay2. AUFS and devicemapper use different on-disk layouts. You’ll need to look up equivalent directories. - Logs: Don’t overlook
$BASE/containers/<CID>/*.log— they often reveal what the container was doing just before shutdown.
Treat these quirks as forensic context — the goal is accuracy, not immediate uptime.
Step 9: Security cleanup
Once you’ve extracted what you need, it’s time for a cleanup pass.
- Rotate all secrets found in
.Config.Env[]or.envfiles. - Remove any temporary copies of recovered secrets or configs.
- Document what you recovered for audit purposes, but redact sensitive content.
Snapshots are a treasure trove for recovery — and for attackers. Handle them with the same care you would a live production system.
Copy-paste command pack
Here’s a condensed toolkit you can drop into your shell to recover a container quickly:
|
1 2 3 4 5 6 7 8 9 10 11 12 13 14 15 16 17 18 19 20 21 22 23 24 |
# Set paths BASE="/mnt/snap/var/lib/docker" CID="<your-container-id>" # Inspect mounts (volumes/binds) jq -r '.Mounts[]?|[.Type,.Name,.Source,.Destination]|@tsv' "$BASE/containers/$CID/config.v2.json" jq -r '.Binds[]?' "$BASE/containers/$CID/hostconfig.json" # Resolve overlay2 writable root if [ -f "$BASE/image/overlay2/layerdb/mounts/$CID/mount-id" ]; then MID=$(cat "$BASE/image/overlay2/layerdb/mounts/$CID/mount-id") elif [ -f "$BASE/containers/$CID/mount-id" ]; then MID=$(cat "$BASE/containers/$CID/mount-id") else MID="" fi ROOTFS="${MID:+$BASE/overlay2/$MID/diff}" [ -n "$ROOTFS" ] && ls -la "$ROOTFS" | head # Common recovery targets ls -la "$ROOTFS/app" 2>/dev/null || true grep -R --line-number -E 'SECRET_KEY|ALLOWED_HOSTS|DATABASES' "$ROOTFS" 2>/dev/null | head |
Wrapping up
Recovering a Dockerized app from an EBS snapshot might sound impossible at first, but as you’ve seen, Docker’s filesystem layout makes it entirely doable.
With a bit of sleuthing — connecting container IDs, mount IDs, and overlay layers — you can pull back everything that mattered: code, config, and even the command line that launched it.
Just remember:
- The writable layer under
overlay2/<mount-id>/diffis the key. config.v2.jsonandhostconfig.jsonreveal how it all fit together.- Anything found in env vars should be considered compromised — rotate secrets.
With these steps, you can confidently recover applications, perform incident forensics, or migrate legacy systems even when the original Docker daemon is long gone.
Need help with container forensics, recovery, or migrations?
Reliable Penguin provides expert DevOps support, incident triage, and Docker environment hardening.




